Just a quick note to my friends, fans, and followers... I know it's been a while since I updated. With the summer waning and my favorite pickling produce vanishing, as well as my opportunities for other fun activities increasing, I have been slacking on my pickling. I do apologize! I have at least on more pickling project I'd like to squeeze in before fall really gets going. A special request for a very dear friend. I'll be checking out the farmer's market at the Virginia State Fair this weekend, and hope to pick up some fine produce to pickle there.
And speaking of the State Fair... last Saturday I submitted four of my most favorite pickles to be entries in the the pickle competition! Here's hoping they like my beets, peaches, wasabeans, and watermelon rind! Woooo! You'll definitely be getting an update when I find out the results. In the meantime, if anyone in the RVA wants to go to the fair with me, it opens tomorrow night, and I've got a season pass, so you're all welcome to come with me any time you want!
Thanks for all the love and support this summer, and I've got cases of pickles just waiting to be shared. Let me know if you want to taste some. I'd love to get some input from you all!
Hugs and stuff,
Jill
Wednesday, September 28, 2011
Sunday, August 14, 2011
Super Funky Beets!
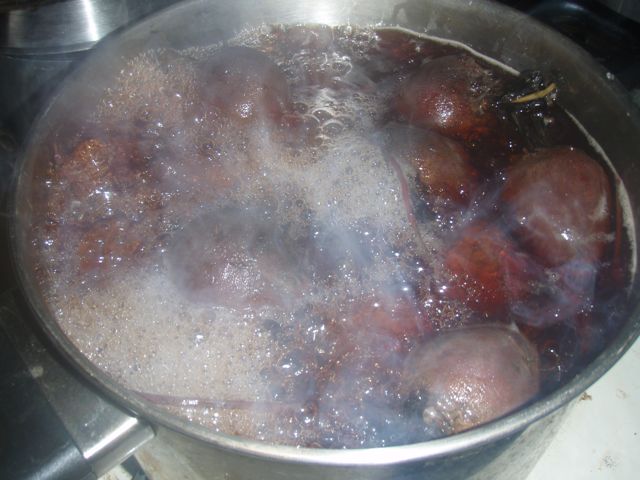
First, I have to give major props to the Farm 2 Family Market for hooking me up with a fabulous box of beets at a super price this week! I had asked for half a bushel, but they weren't able to get me that much, and we were all sad, but this was The Universe working in my favor. For real, I could NOT have processed one more beet this weekend. I'm all beeted out. And totally thrilled that I have SO MANY jars of magically delicious pickled beets to show for it! But I really was remiss. I should have taken a picture of the box of beets. It seemed small at first, but each time I looked at it, it was bigger. By Saturday morning, that box was HUGE and I was worried I wasn't going to be able to get them done. I had to do them in two batches, mainly because I don't have a pot big enough to boil 10+ pounds of beets at a time, and my canner only holds 8 pint jars.
So, to begin: scrub your beets, but leave the tops and rootlets on.

Side note: I was very excited to find some itty bitty beets in the bottom of the box. Enough for one jar of whole mini beets, which I'll serve at Thanksgiving. Yay!!

Then you boil them for a bit. Between 10 and 30 minutes, depending on the size. The goal is to cook them just enough so you can slip the skins off after cooling them.
To cool them (just like peeling peaches) ICE BATH!:

Batch One I totally didn't boil long enough, so it was out with the trusty ceramic peeler again. I really prefer the aesthetics of the skin-slipped beet over the peeler-peeled beet, so I made a note to add 10 minutes to the second batch's boiling time. Not that anyone who opens a jar of these beets and eats them will notice whether they were peeled with a peeler (except maybe the State Fair judges. Yes, I'm getting a little obsessed...) but I'll know. Of course, the peeler takes about 10 seconds per beet, while slipping the skin can be a long and messy process. But, like making good watermelon rind pickles, the time spent is worth it, in my opinion.
After the beets are peeled and the pickling brine is made (secret recipe! email me and I'll give it to you! so not quite secret, I guess....) and your jars and lids are sterilized, slice up your beets into 1/4 slices. You could get one of those fancy wavy slicers. I almost did, but resisted. One of my simplest pleasures in life, something that makes me happy beyond words is beet grain. Like the circles of an old tree, I love the circles in a sliced beet. Joy!

I packed my jars nice and tight, plus my one jar of whole mini beets.

Process per your tested recipe guidelines (my recipe called for 30 minutes in a boiling water bath). Then, ta da!! You have wonderfully canned, beautiful pickled beets!


Monday, August 8, 2011
The Most Fabulous Watermelon Rind Pickles Ever
I sure am lucky to have such a selective memory, because I always seem to forget how much work watermelon rind pickles are. I only ever remember how much I love them. So when I found out there is actually a category in the State Fair pickle competition specifically for watermelon rinds, I knew that I had to submit mine. Once I win my blue ribbon, I'll gladly share my recipe with you all. It's based on one in the Joy of Pickling book, with some spice alterations of my own that I came up with after experimenting all last summer. I really think this batch I've just finished is really going to knock your socks off!


I ended up with 13 half pints! 4 short fancy jars of square-cut rinds, 4 jars of fancy shapes (I'll pick the best to submit for competition, the others will be special gifts or special occasions... Mendelson Brunch, I'm looking at you!) and 5 jars of scrap shapes... those will be gifts for my creative friends! Like looking at clouds... they can find ones that look like a dinosaur riding a bicycle! Or a clown shooting a bow and arrow! Oh, it'll be ever so fun!

To begin:
Ask your favorite farmers how thick their watermelons' rinds are. Or if they are growing heirloom watermelons. Heirlooms tend to have thicker rinds. Seedless tend to have thinner rinds. Know your farmers, ask them about their produce. How I found my fabulously thick-rinded melons this year? I asked one farmer if his watermelons had nice thick rinds because I was going to be pickling them, and he said no, but said that that farmer over there, with the red awning, had super thick-rinded ones. How cool is that? So I got:

And scrubbed them good. These were small melons. Smaller than I would have liked. Like tetherball size.
See how nice and thick the rind was?

Commence watermelon deconstruction.


So, yeah, that took about 2 hours. You really have to get every bit of pink off. Lucky for me that cute paring knife is super sharp, and my fantastic ceramic peeler is killer on the tough rind. Also, I had total prune hands when I was done. Watermelons really are all water!
So then, because I'm a big nerd and I really want to win, I took teeny cookie (well, the label said they were for aspic but the thought of aspic makes me shudder...) cutters to about 1/3 of the rinds. These will be specifically for the pickles I submit to the state fair competition. The Victorians used to cut their watermelon rind pickles into fancy shapes, so that's what I'm doing for mine! Of course, that added another couple of hours to the rind prep...


Hearts and moons and stars... and clovers! I expected some kids to chase a Leprechaun through my living room. Then 1/3 of the batch is scraps from the cut-outs, and the last 1/3 is just squares. So after 5 hours of peeling and trimming rinds, into my brining solution they went until the next day...
The brine:


Sunday was rinse and boil day! How exciting! After brining overnight and rinsing thoroughly to get all the salt out, it was time for a brief simmer. I love the results of this phase... so pretty!

Then it's time for the final soak in the pickling liquid. I prepare my dry ingredients....

I'm not telling what's in those spice bags right now... you get the general idea. The general, delicious idea!! Combine those with the vinegar (I'm not saying what type or types I used! This is my blue ribbon recipe here!) and sugar, bring it to a boil, toss in your rind, and then soak it overnight again.
Note that not all recipes are this long and drawn-out.... but I tried out a bunch of different methods last summer and this one was so much better than all the others I really think it's worth the time. If you find a recipe that's shorter and you love it, that's awesome! You make whatever pickles you like the best!
So now it's Monday night and I've just finally pulled my last batch of half-pints out of the canner... Phase III was simply bring the rind up to a simmer in the pickling liquid, simmer until it was translucent, then can it.

I ended up with 13 half pints! 4 short fancy jars of square-cut rinds, 4 jars of fancy shapes (I'll pick the best to submit for competition, the others will be special gifts or special occasions... Mendelson Brunch, I'm looking at you!) and 5 jars of scrap shapes... those will be gifts for my creative friends! Like looking at clouds... they can find ones that look like a dinosaur riding a bicycle! Or a clown shooting a bow and arrow! Oh, it'll be ever so fun!

The end. Wish me luck at the State Fair! And come with me on October 9th to watch the demolition derby!
Sunday, July 17, 2011
Okra Redemption
So last weekend the Okra beat me. But those of you who know me well, know what a sore loser I am. I couldn't leave it like that. While picking up my free gift share of fabulous Agriberry blackberries, blueberries, peaches, nectarines, and donut peaches (I am seriously in fruit heaven!) at the Monument Market, which I hadn't been to before, I found some perfect okra for pickling, and I knew this was my chance for redemption!
 No way was this okra going to be too big for the jars! HA! Perfect little bite sized pickled okra. Of course, some were bigger, but these were too good to pass up. So I brought them home and got to work! You don't need the full recap of last week's process, so here's the brief version:
Gather ingredients. Garlic, dill and dill seeds. Also some crushed red peppers.
 Wash okra and remove any split pods or otherwise imperfect ones.
 Prepare mise en place. Measure spices for each jar and slice garlic, etc.
 When jars are sterilized, add spices and dill, pack with okra, add brine, top with sterilized lids.
 Hot water bath for 15 minutes. With no mishaps (YAY!) the end result was: 3 fully packed pints and one half-packed pint. These are going to be soooooo much better than last week's! Lisa, I have my eye on the best one of the lot just for you!
 High on the endorphins of my okra victory, I decided to try something new:
So all this lovely fruit from Agriberry, coupled with some other events of the season, has had me thinking about freezer jam. I'm not a big jammer, but Grandma's Strawberry Jam is legendary in my family and it's so good because it's a no-cook freezer jam and the fruit doesn't lose any of the fresh berry flavor in a cooking or canning process. So I've been wanting to do a peach freezer jam, and this weekend seemed like as good a time as any. I was hoping for more peaches in my Agriberry share (not a big fan of nectarines), but I'm not one to complain about free fruit, so I picked up some other local peaches, and some of Grandma's secret ingredient for her Strawberry freezer jam: Certo. (Also the tip from Grandma: don't use store bought lemon juice! Squeeze the lemon juice yourself!) So, refer back to Pickled Peaches to see how to peel them, then here's what I did:
Quartered my peeled and pitted peaches.

Mashed 'em up (the recipe said chop them in a Cuisinart, but mashing seemed so much more fun)

Added a ton of sugar, and let sit for 10 minutes, stirring occasionally. Then I added the Certo/lemon juice mix.

Stirred for 3 minutes. There weren't supposed to be any sugar crystals left, but it was totally grainy still, so I stirred for two more minutes and it was good to go. After disinfecting my freezer jam containers...

 ... and drying them thoroughly, I filled my containers with my jam!
 Then they had to sit for 24 hours at room temperature. I've only just moved 4 into the freezer. One into the fridge for personal use, and one is going to a friend this evening for immediate feedback. So there you go! Freezer jam is crazy easy. Make some next time you have 3 cups of fruit you don't know what to do with!
Gather ingredients. Garlic, dill and dill seeds. Also some crushed red peppers.


So all this lovely fruit from Agriberry, coupled with some other events of the season, has had me thinking about freezer jam. I'm not a big jammer, but Grandma's Strawberry Jam is legendary in my family and it's so good because it's a no-cook freezer jam and the fruit doesn't lose any of the fresh berry flavor in a cooking or canning process. So I've been wanting to do a peach freezer jam, and this weekend seemed like as good a time as any. I was hoping for more peaches in my Agriberry share (not a big fan of nectarines), but I'm not one to complain about free fruit, so I picked up some other local peaches, and some of Grandma's secret ingredient for her Strawberry freezer jam: Certo. (Also the tip from Grandma: don't use store bought lemon juice! Squeeze the lemon juice yourself!) So, refer back to Pickled Peaches to see how to peel them, then here's what I did:
Quartered my peeled and pitted peaches.

Mashed 'em up (the recipe said chop them in a Cuisinart, but mashing seemed so much more fun)


Stirred for 3 minutes. There weren't supposed to be any sugar crystals left, but it was totally grainy still, so I stirred for two more minutes and it was good to go. After disinfecting my freezer jam containers...


Sunday, July 10, 2011
Okra. When easy things become difficult.
It was a beautiful day for the farmers market yesterday, and accompanied by my good friend Jen, we had a lovely time browsing the stalls and admiring all the beautiful produce that is available this time of year. I really want to figure out how to pickle kohlrabi before the season's done! I handed out some of my fabulous new business cards to some of my favorite farmers, and asked them to let me keep me posted about some of the special produce I'm eagerly anticipating is due (thick rind watermelon in particular!!)
But I was on a mission, I knew exactly what I wanted yesterday. Okra. I had seen really beautiful okra last time, and my spicy dilly okra was such a big hit last year I knew I needed to get a jump on it. I also wanted to get more green beans because everyone is asking for a jar of my wasabeans and I only made 6 pints last time (I swear, once I can legally sell these things I'm gonna make a mint!) so I knew I had to make more of those. So optimistic (or is that masochistic?) me planned a double-pickle Saturday.
First up: The Okra!

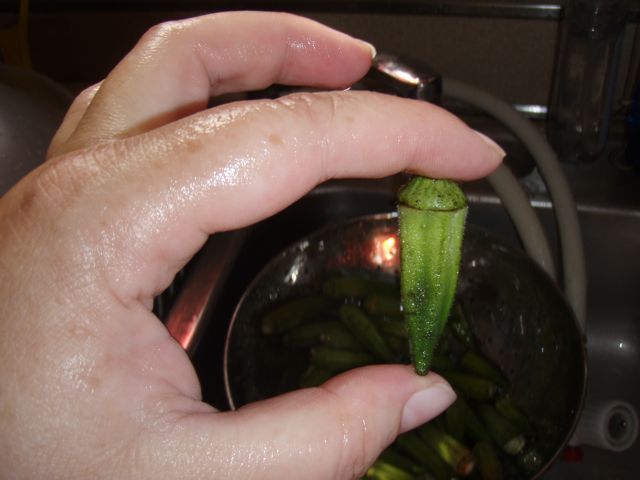
I need to say right off the bat that I clearly did NOT pay close enough attention to the recipe when it said to choose small pods. I thought I was choosing the smaller of the pods that the farmer had on display. I was so excited and distracted by the beautiful day and a million other beautiful types of produce (this vendor has about 18 different kinds of peppers... even purple ones!) that I ended up choosing about a third of my okra that was simply too huge to fit in any of my jars. Doh! I had some of the 12 oz tall jars, but I was saving those for the the next round of Wasabeans... so I have this much fresh okra left:

Seriously, if anyone wants it, come get it. I'm not going to use it. I really only like it pickled. Hit me up in the next day or two and it's yours. I hate to throw it away, but apparently if you cut the pods and the slime gets in your brine when you're pickling, bad things happen (not like botulism bad, but still)... so HEY KIDS, FREE OKRA!! COME N' GET IT!
So yeah. Wash short okra, trim stems, gather the rest of my ingredients, including a fabulous gift from Jen:

Some beautiful lovely fresh dill! I have lots left over... What to do with all this wonderful dill?? I hate to just stick it in the dehydrator? Do you put dill in tzatziki? I could make that...
Anyway, the rest of the ingredients:

One note: I get my bulk spices at either Good Foods Grocery or Ellwood Thompsons, both super local businesses where you can get just the spices you need for so much cheaper than buying them in jars at any grocery store... seriously, go buy your spices there!! Get some cute little jars at World Market for a buck a piece, you're all set.
Ok, so after losing a third of my okra due to their size, I only got three measly pints packed, and those not as tightly as I would have liked:

So after all that, the end result was

And my cousin Lisa gets one simply for her overwhelming appreciation of last year's okra pickles. The jar in the middle will be the tasting jar, since it managed to fall over in the canner and lose some of its brine. I swear nothing went right with these pickles. But I guess I learned a lot. If everything had gone perfectly I wouldn't have learned very much, now would I?
So feeling very frustrated I proceeded to take a long nap, then watch some netflix and get some dinner. Then about 10:30 I started some more wasabeans! Because nothing cheers my up like pickling! (Well, technically I did it because I had 4 pounds of fresh and beautiful green beans and if I didn't do them then I wouldn't have another chance until Wednesday, and by then they wouldn't be fresh and beautiful anymore....) So you can reference my last entry for the process, substituting tall 12 oz jars for the pints (so I could get 8 jars instead of 6) and about 1:30 in the morning I ended up with:

Yay!! Now there should be enough for everyone to have some... but bribes are still the best way to ensure you get some. Two weeks left until we can taste the first batch!
Now I'm off to my VICFA meeting to talk about how to get homemade pickles legalized in Virginia, so that I can sell you guys my fabulous, wonderful pickles!
But I was on a mission, I knew exactly what I wanted yesterday. Okra. I had seen really beautiful okra last time, and my spicy dilly okra was such a big hit last year I knew I needed to get a jump on it. I also wanted to get more green beans because everyone is asking for a jar of my wasabeans and I only made 6 pints last time (I swear, once I can legally sell these things I'm gonna make a mint!) so I knew I had to make more of those. So optimistic (or is that masochistic?) me planned a double-pickle Saturday.
First up: The Okra!

I need to say right off the bat that I clearly did NOT pay close enough attention to the recipe when it said to choose small pods. I thought I was choosing the smaller of the pods that the farmer had on display. I was so excited and distracted by the beautiful day and a million other beautiful types of produce (this vendor has about 18 different kinds of peppers... even purple ones!) that I ended up choosing about a third of my okra that was simply too huge to fit in any of my jars. Doh! I had some of the 12 oz tall jars, but I was saving those for the the next round of Wasabeans... so I have this much fresh okra left:

Seriously, if anyone wants it, come get it. I'm not going to use it. I really only like it pickled. Hit me up in the next day or two and it's yours. I hate to throw it away, but apparently if you cut the pods and the slime gets in your brine when you're pickling, bad things happen (not like botulism bad, but still)... so HEY KIDS, FREE OKRA!! COME N' GET IT!
So yeah. Wash short okra, trim stems, gather the rest of my ingredients, including a fabulous gift from Jen:

Some beautiful lovely fresh dill! I have lots left over... What to do with all this wonderful dill?? I hate to just stick it in the dehydrator? Do you put dill in tzatziki? I could make that...
Anyway, the rest of the ingredients:

One note: I get my bulk spices at either Good Foods Grocery or Ellwood Thompsons, both super local businesses where you can get just the spices you need for so much cheaper than buying them in jars at any grocery store... seriously, go buy your spices there!! Get some cute little jars at World Market for a buck a piece, you're all set.
Ok, so after losing a third of my okra due to their size, I only got three measly pints packed, and those not as tightly as I would have liked:

So after all that, the end result was

And my cousin Lisa gets one simply for her overwhelming appreciation of last year's okra pickles. The jar in the middle will be the tasting jar, since it managed to fall over in the canner and lose some of its brine. I swear nothing went right with these pickles. But I guess I learned a lot. If everything had gone perfectly I wouldn't have learned very much, now would I?
So feeling very frustrated I proceeded to take a long nap, then watch some netflix and get some dinner. Then about 10:30 I started some more wasabeans! Because nothing cheers my up like pickling! (Well, technically I did it because I had 4 pounds of fresh and beautiful green beans and if I didn't do them then I wouldn't have another chance until Wednesday, and by then they wouldn't be fresh and beautiful anymore....) So you can reference my last entry for the process, substituting tall 12 oz jars for the pints (so I could get 8 jars instead of 6) and about 1:30 in the morning I ended up with:

Yay!! Now there should be enough for everyone to have some... but bribes are still the best way to ensure you get some. Two weeks left until we can taste the first batch!
Now I'm off to my VICFA meeting to talk about how to get homemade pickles legalized in Virginia, so that I can sell you guys my fabulous, wonderful pickles!
Saturday, June 25, 2011
Wasabi Green Beans
First, mad props go to Rick's Picks for this recipe. My sisters brought me back some of his Smokra recently and it was awesome! I visited his site and saw his Windy City Wasabeans and fell in love immediately! Then joy of joys, I found that he had shared his recipe on the Whole Foods Website! So there was no question what this week's pickle would be.
Bright and early this morning I headed over to the West End Farmer's Market to see if one of my favorite farmers, Gene of Riparian Farms had any green beans. He did, and he hooked me up! Also, Agriberry (of the Asparagus fame) had their first peaches of the season, and blackberries bigger than my thumb, so I had to get some of their fabulous fruit, too. Anne (the owner of Agriberry) was being interviewed by Channel 12, so I totally snuck into the background and made a show of admiring the peaches and buying some while they were filming her. I'm such a dork. Yay!
So then I gathered the rest of my ingredients. I had most everything I needed except for the wasabi powder. Here's a fabulous tip. Don't buy it in the Asian section of ANY of the regular grocery stores. It's a RIP OFF. Go to Tan-A (if you're a Richmonder, you know where it is, even if you've never been inside) it costs a fraction of the supermarket price there. Plus you can get shrimp chips!! YUM!
So yeah, got home, started my prep:
 Measured out my wasabi powder to make sure I had enough, peeled a zillion cloves of garlic. Made my brine (no pic of that... too boring, but it sure smelled good!) Also, check out my awesome new paring knife! On clearance at Sur La Table (online only) but get a couple friends together to save on shipping. You get an adorable set of three. With sheathes so you can take them camping and stuff. LOVE! (They totally should pay me for that endorsement.)
Then washed and trimmed my green beans. Tedious! And I only did 4 pounds so far. I'm going to do another 4 pounds later today or tomorrow. (Probably tomorrow.)
 So fresh and so clean! Delicious too! Something about veggies that were in the field just 24 hours ago that taste so yummy.
Then with my jars all sterilized, I put in the garlic and the wasabi powder:

Packed in my green beans (I'm really trying to pack my jars tighter, but I don't know if I'm getting them tight enough. I ran out of brine HALF WAY THROUGH and had to quick whip up a whole second batch! Can that be right? This learning process is harder than I thought it would be.)
But check out the final product!
 6 pints of fabulous smelling soy ginger garlic wasabi pickled green beans. And I'll do 6 more pints tomorrow! These are going to knock you socks off! I'm thinking these are for my most special friends.... So who are the lucky ones? We can taste these July 23 or later.... so you have plenty of time to come up with bribes. GO!
Bright and early this morning I headed over to the West End Farmer's Market to see if one of my favorite farmers, Gene of Riparian Farms had any green beans. He did, and he hooked me up! Also, Agriberry (of the Asparagus fame) had their first peaches of the season, and blackberries bigger than my thumb, so I had to get some of their fabulous fruit, too. Anne (the owner of Agriberry) was being interviewed by Channel 12, so I totally snuck into the background and made a show of admiring the peaches and buying some while they were filming her. I'm such a dork. Yay!
So then I gathered the rest of my ingredients. I had most everything I needed except for the wasabi powder. Here's a fabulous tip. Don't buy it in the Asian section of ANY of the regular grocery stores. It's a RIP OFF. Go to Tan-A (if you're a Richmonder, you know where it is, even if you've never been inside) it costs a fraction of the supermarket price there. Plus you can get shrimp chips!! YUM!
So yeah, got home, started my prep:

Then washed and trimmed my green beans. Tedious! And I only did 4 pounds so far. I'm going to do another 4 pounds later today or tomorrow. (Probably tomorrow.)

Then with my jars all sterilized, I put in the garlic and the wasabi powder:

Packed in my green beans (I'm really trying to pack my jars tighter, but I don't know if I'm getting them tight enough. I ran out of brine HALF WAY THROUGH and had to quick whip up a whole second batch! Can that be right? This learning process is harder than I thought it would be.)
But check out the final product!

Tuesday, June 7, 2011
A Peck of Pickled.... Peaches?

So it started out simple enough. Boil some sugar and some vinegar with some spices (I added some extras to the "Traditional Southern Spiced Pickled Peaches" recipe I had. Cardamom, allspice, more ginger....) let that steep for an hour while I peeled my 6 pounds of peaches. No biggie. You all know how to peel a peach (just like you do tomatoes): drop it in boiling water for 30 seconds or so, then ice bath!

The skins slip right off. It's actually super fun. Then cut 'em in half, pop out the pit (thank goodness for freestone peaches!) and into acidulated water so they don't brown. Really basic stuff here. While I was peeling the peaches, I had my canner going, getting my pint jars nice and sterile. The basic routine. Peaches done, jars sterile, add peaches to pickling liquid to get everything nice and hot. Then the fun part. Packing the peaches curved side down to avoid the cavities filling with air. Much harder than it sounds. I'm sure it'll get easier with practice, but my goodness those things are slippery and geez was everything hotter than hell! But I did succeed in packing six pints:

Then filling them with the pickling liquid, getting what I thought were all the air bubbles out, putting on the lids, and processing. But somehow when all the jars were full, I still had over a quart of delicious sweet peach vinegar left!!

I processed a pint of it to keep, but this jar is going in the fridge... not sure what to do with it. Mix with greek yogurt as a topping for fruit salad? I'm open to suggestions. Or if anyone wants some I'll gladly give out half pint jars... just hit me up!
So, the end result:

Six super yummy looking pints of spiced pickled peaches (that's a big chunk of ginger in the bottom of the jar on the left. YUM!) I hear they go great with cheesecake.... who out there's a baker?
One last question. All of my recipes suggest a specific waiting time before you taste them. But this one doesn't. Who thinks I should take these to the potluck at Polyface Farm next weekend as part of my pickle platter? Vote in the comments or on my Facebook!
Saturday, May 21, 2011
In which I learn much about pickling asparagus.
First, I must give a huge shoutout to Agriberry! Not only do they have fabulous strawberries right now (and other luscious berries soon to come, in addition to the best peaches around come summer, and hands-down the most amazing Honeycrisp apples in the fall) Anne (the owner) hooked me up with a couple of pounds of the best asparagus to be found anywhere. And I mean anywhere. Not just Richmond, or Virginia. Seriously, I wait all year for the Agriberry asparagus, and when it arrives at my local farmers market (and really, I go to every market on a rotating basis.... share the love!!) I buy pounds and pounds of it and eat it daily. Sometimes twice a day. So I was sad when their season was ending and I still hadn't gotten any to pickle. Luckily I ran into Anne at a midweek market, and she said she'd try to save a couple of pounds for me to pick up today. Like the fabulous farmer-lady she is, she came through, and I joyously bought several pounds of her asparagus today, when no one else in Richmond, no matter which market they were at (Agriberry is at just about every local Saturday market) was able to buy some. One more reason to know your farmers, kids!


One more big thank you goes to Mr. Leonard's Sharpening Service, who is at the St. Stephens Saturday market every other weekend. He did a killer job sharpening my chef's knife and my paring knife. Sharp knives are things of beauty in the kitchen! What a great idea to have a knife sharpener at a farmers market!
So, to the asparagus! I went with a pretty classic recipe, not dilly, not overly herby, with a little kick and some interesting flavors I think will be subtle and delicious.... I happily set about washing my lovely long spears.
I specifically chose the 12 oz jelly jars since they are tall and skinny. They seemed perfect for asparagus, and the recipe I chose concurred. So after washing my asparagus, I trimmed it down to fit the jars. This was the result:
I was a bit surprised at how little I was left with to pickle, when I had this much "refuse" left over:
So since there were some super long stems in there, and I only had 4 jars of tips packed, I did a jar of stems... I figured we can taste those for flavor, since Agriberry asparagus stems are just as yummy as the tips! After adding my secret spices, here's what I had:
That's five sterilized 12 ounce jelly jars, which I then topped with sterilized lids, and processed in a hot water bath for 10 minutes. The result:
Some stray observations:
• In my initial research, there seems to be a lot of debate about packing your jars tips-up or tips-down. I packed mine tips up because I thought they'd look nicer, though I had to be a little more gentle with them.
• Next time I'll choose shorter asparagus. I thought it would matter if they were straighter, but the curvy ones packed just as easy. No big thang.
• Will thick stems matter versus thin stems? We'll have to see when we taste them!
• One of my secret ingredients was chunks of freshly smashed nutmeg. Someone please tell me what to do with the rest of this nutmeg!
• These will be ready to taste in three weeks, right when we can taste the pickled garlic scapes! Anyone wanna have a pickle picnic with me? I have some leftover pickles from last season that need to be eaten! Beets, romanesco, eggplant, bread and butter zucchini, cauliflower, pears, and watermelon rind. Sounds like a party! Wooooo!
Subscribe to:
Comments (Atom)